Correct Installation of Brake Shoes
1. The Correct Installation of Brake Shoes
Removing the Old Pads:
As with any installation, it is advisable to thoroughly clean the entire bike, or if you're in a hurry, just the area where you will be working. To remove the old brake pads, it's best to first loosen the cable clamping screw. This provides enough space to loosen the nuts of the old pads and remove them. After this, it's advisable to clean the area thoroughly again.
Preparing the New Brake Shoes:
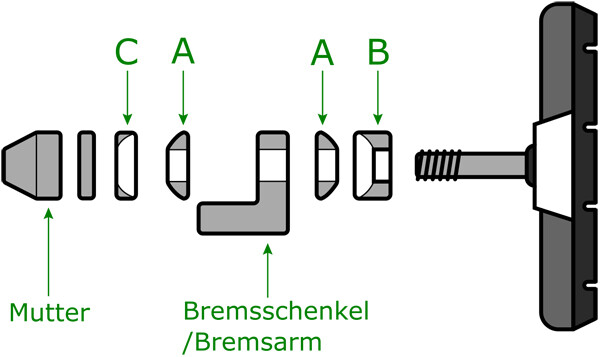
For the installation of the new brake shoes, the following arrangement of all washers on the base of the brake pad is essential: the concave (inwardly curved) washers B and C enclose the convex (outwardly curved) washers A, forming a kind of ball joint, as illustrated in the figure.

Once the new brake pads are screwed on, it is important to check whether the brake arms are protruding too far. For this, press the brake pads against the braking surface of the rim, as if you were braking. If the distance between the cable guide tube and the cable clamping screw is significantly more than 40 mm, the distance is too large. In this case, the washer B should be positioned on the outside and C on the inside.

Adjusting the Brake Pads to the Braking Surface
Thanks to the ball joint of the washers, the brake pad can be perfectly adjusted to the rim. By tightening the nut at the end of the brake pad base, the position of the brake pad can be secured or released.
The correct adjustment of the brake pad can be achieved through two adjustment options:
- Moving up and down in the elongated hole of the brake arms.
- Tilting in all directions through the ball joint between the washers A, B, and C.
For optimal braking performance without squeaking or similar issues, the following aspects should be considered:
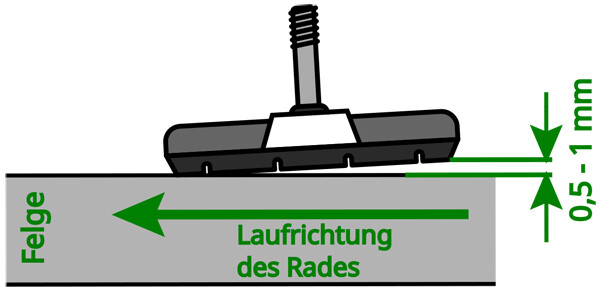
1. The brake pad should protrude about 1 mm at the rear end in the direction of rotation.
ATTENTION ! Under no circumstances should the rear edge of the brake pad touch the rim before the front edge.

2. The lower and upper edges should simultaneously make contact with the braking surface during the braking process. The brake pad should be mounted 3 mm below the braking surface.
ATTENTION ! If the brake pad touches the tire, there is a risk of damaging the tire's casing.

2. Adjusting the Brake (Correct Cable Length and Centering of the Brake Arms)
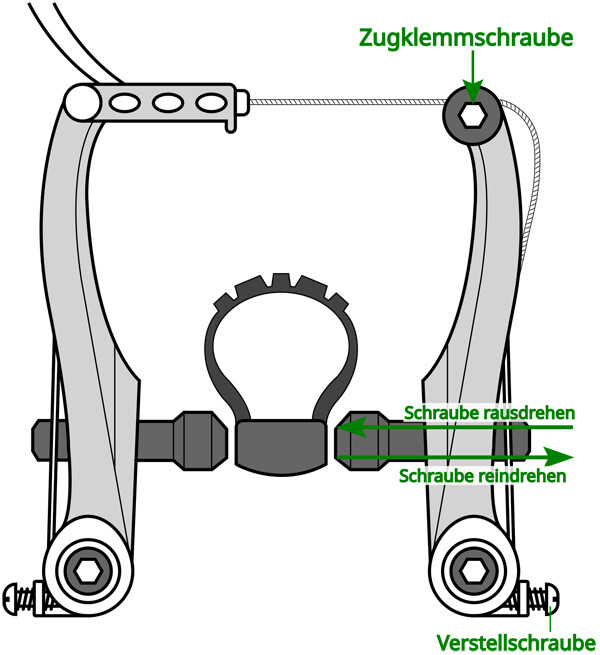
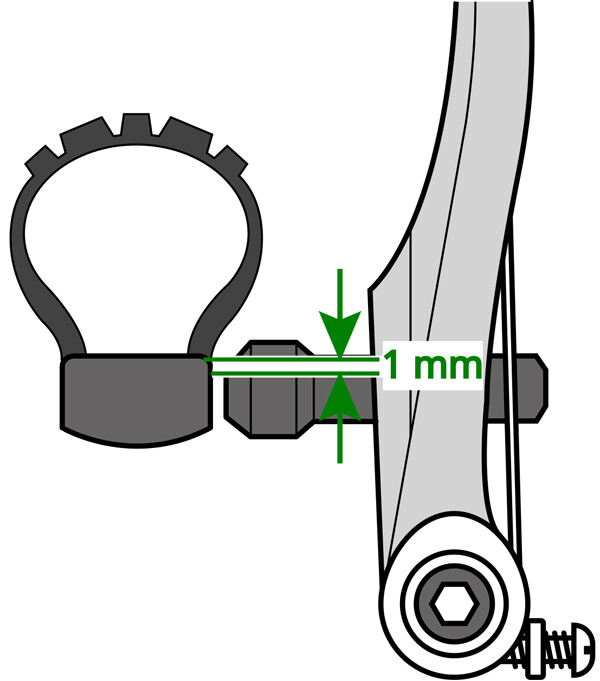
If the brake cable has been removed, rethread it through the cable clamping screw. Next, pull the brake arms together so that there is a gap of about 1-2 mm between the brake pad and the braking surface. Then tighten the clamp screw of the inner cable. If the rim has any lateral run-out, please correct it before proceeding.
The centering of the brake arms is adjusted with the adjustment screws. Some brakes do not have these screws or grub screws (which completely disappear into the brake arm and are tightened with an Allen key).
The more the screw is turned in, the tighter the spring tension and the brake arm tilts further to the right. Turning it out reduces the spring tension, and the brake arm moves back to the left. The brake arms should be adjusted so that the right and left brake pads are equidistant from the rim. After each adjustment of the set screws, the brake lever should be pulled once to allow the brake arms to find a balanced position.

How Do I Properly Dismantle Old Brake Pads?
- Clean the bike or the assembly area thoroughly. Loosen the cable clamping screw to loosen and remove the nuts of the old pads. Then clean the area thoroughly again.
How Do I Prepare the New Brake Shoes?
- The correct arrangement of all washers on the base of the brake pad is essential. Pay attention to the arrangement of washers A, B, and C to form a ball joint. Check the distance between the cable guide tube and the cable clamping screw.
How Do I Adjust the Brake Pads to the Braking Surface?
- Perfectly adjust the brake pad to the rim using the ball joint of the washers. Secure the position by tightening the nut on the base of the brake pad. Note the up and down movement in the elongated hole of the brake arms and the tilting of the brake pad.
What Should I Consider When Adjusting the Brake Pads?
- The brake pad should protrude about 1 mm at the rear. Ensure that the lower and upper edges make contact with the braking surface at the same time during braking. Mount the brake pad 3 mm below the braking surface.
How Do I Adjust the Correct Cable Length and Centering of the Brake Arms?
- If necessary, rethread the brake cable and pull the brake arms together until a gap of about 1-2 mm exists between the brake pad and the braking surface. Adjust the centering of the brake arms using the adjustment screws.
Buy Brake Pads Now:
Here you can find a large selection of brake shoes for bicycles directly.